After the successful development of your Magento store, the Magento Store Development Company will not be responsible for adding content in the future and there may be scenarios when you want to add new pages to your e-commerce store. Thus, you must know how to create a new CMS page in Magento 2. Although, if you have hired a Magento development company for ongoing maintenance then you may ask them to create new pages. Still, we believe you must have knowledge as well. Thus, in this guide, we will tell you how you can create a new CMS page in Magento 2.4.2.
Adding a New CMS Page:
Adding a new page in your e-commerce store is essentially the same for any page type you want to create such as homepage, new CMS page, etc. You can add text, images, content blocks, widgets, and variables. While developing the content pages, generally the first focus is that they should be search engines and then by the users. Thus, keep both entities in mind while choosing the title of the page, URL, metadata composition, and content. After the completion of the page, you can add it to your store navigation, link it to other pages, add it in footer links, or use it as a new Home Page.
We will walk you through all the necessary steps you should follow to create a basic page. Please log in to your Magento Admin Section, and then follow these steps:
1st Step: Add a New Page
I. In the sidebar of your Admin section, navigate to Content > Elements > Pages
II. Click on Add New Page
The New Page window will be like this:
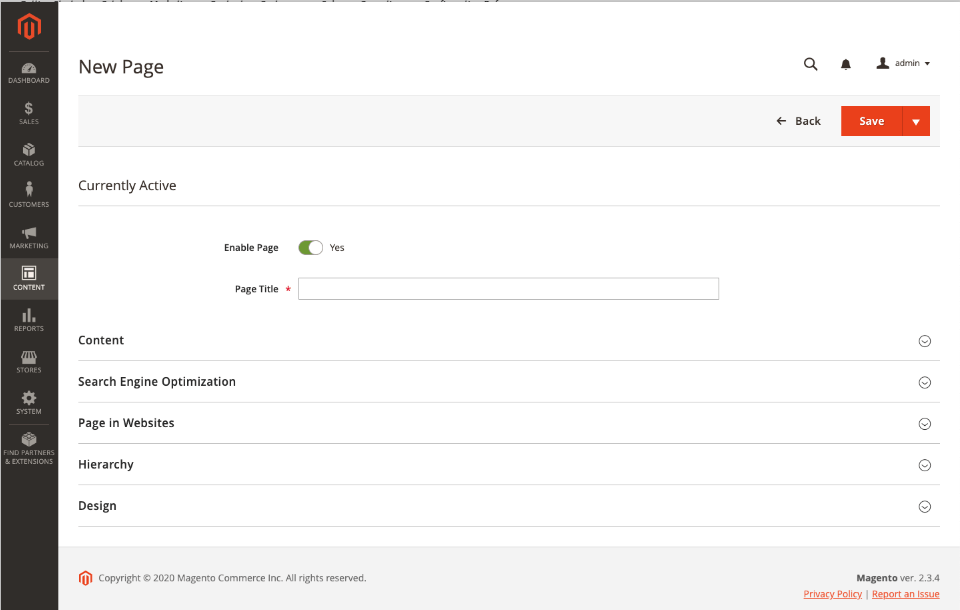
III. If you don’t immediately want to publish this page, select No for Enable Page
IV. Enter the title of the page in Page Title (The Page title appears in the breadcrumb navigation)
2nd Step: Add Content:
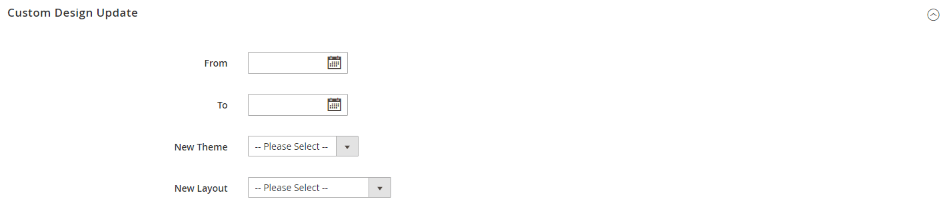
Here you have to use a Custom Design Update (For Magento Open-source)
I. In order to schedule design changes, expand Custom Design Update
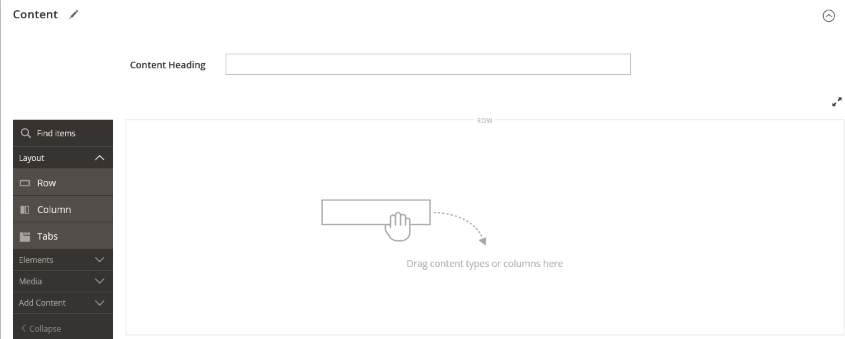
II. Expand the Content section
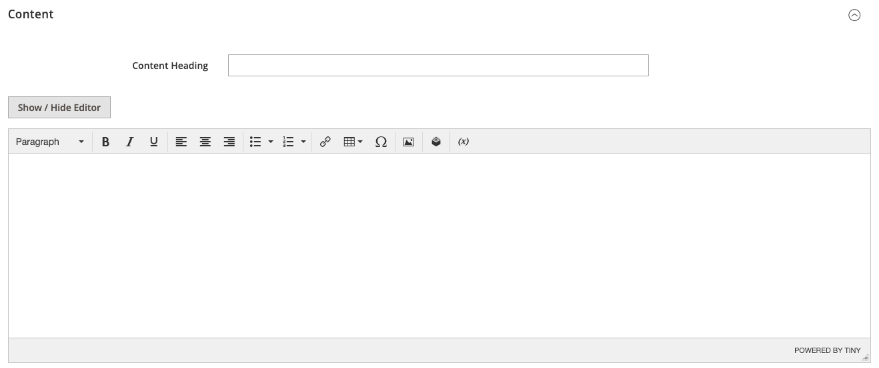
III. In the Content section, there is a heading box in which you can enter the main heading of your page.
IV. Fill in the content and format the text as per your choice. In the content, you can also add images, variables, and widgets if required.
V. After entering the content, click on Save.
If you are using Magento Commerce, you can also use Page Builder content tools
The initial step is the same, you first have to expand the content. Then, enter the heading in the Content heading box. If you have enabled the Page Builder, the content panel will appear below the content heading.
Fill in the content and format it as you required.
3rd Step: Fill in the SEO information
As we mentioned above, a new page should be readable for the audience as well as the search engine. Thus, you must optimize it for the best SEO levels.
I. Expand the Search Engine Optimization
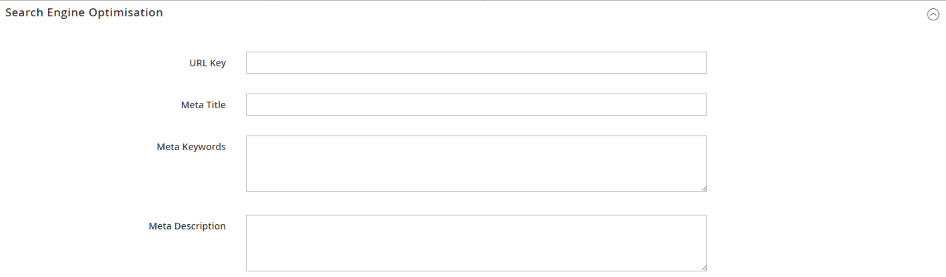
II. There will be a default URL key that was created while you saved the page. It is based on the heading of the content. You can either accept or can enter your own URL key which should consist of lowercase letters, with hyphens instead of spaces.
III. Enter the Meta Title of the page. It should be less than 70 characters and will display in the browser title bar and tab.
IV. Enter the high-value meta keywords by which search engines can easily index the page.
Each keyword should be separated using a comma. Some search engines ignore meta-keywords but search engines like Google use them.
V. Enter meta description, which is a brief description of the page for listings in search engine. The maximum limit of meta description is 255 characters but the ideal length of meta description is 150-160 characters.
VI. Click on the Save button.
4th Step: Mention the Scope of the Page
I. Expand Page in Websites
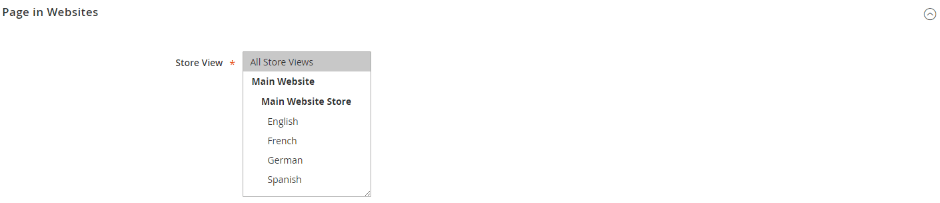
II. In the drop-down of Store View, select each view where the page should be available. If you are using multiple websites, select each website and store view where should be available.
5th Step: Select Parent Page (if required):
This functionality comes only in Magento Commerce, in the hierarchy select the checkbox of the parent page if the page is a child of any other page.
6th Step: Page Preview
I. Click on the Save arrow and choose Save & Close so that you will return to the Pages grid.
II. Find the page in the grid and select View in the Action column.
III. Click the Back button of the upper-left corner so that you will return to the grid.
7th Page: Publish Page
I. Select Edit in the Action column
II. Set Enable Page to Yes
III. Click the Save arrow and choose Save & Close

Wrapping Up:
In this article, we have tried to make you understand how you can create a new CMS page in Magento 2. At Ceymox Technologies, the best Magento development company in India, we are having expertise in creating new pages and making a backend by which you can easily create new pages. We will also give you a tutorial on similar functionalities. Let us know your requirements.
 Hubspot SEO Certified |  Hubspot SEO II Certified |  Google Ads Search Certified |  Google Analytics Certified |
Sreehari N Kartha is a skilled Digital Marketing Analyst at Ceymox, certified in SEO. His expertise encompasses a wide range of digital marketing strategies, including managing advertising campaigns on platforms like Google Ads, Facebook Ads, Instagram Ads, WhatsApp Ads, and LinkedIn Ads. With a strong foundation in SEO and SMM, Sreehari is adept at optimizing online visibility, driving engagement, and generating qualified leads and conversions. His passion for emerging technologies, such as Crypto, NFTs, and Web3, further complements his skillset, enabling him to navigate the dynamic digital landscape.
View All Articles