
Have you successfully developed your Magento 2 store? Congratulations! But are you sure that everything is alright? All the issues have been resolved, is it on the latest version etc. etc?
Before launching a store to go live, there are several things that you need to check. In fact, there is a complete checklist that you have to mark as done. In this article, we will be focusing on every aspect of the “ Go live checklist for your Magento store” so that there will be no oops ” moment for your Magento store.
Go Live Checklist:
- Latest version check
- Requirements of the system
- Check Favicon
- Store URLs Check
- SSL set up
- 301 Redirects
- 404 error page
- SEO audit
- Integrate Google Tools
- E-mail Setup
- Cart Options
- Shipping methods checking
- Payment methods checking
- Check Tax Settings
- Store Information check
- Modify the Admin URL
- Inventory checking
- Extension license checking
- Cron Job
- Caching & Indexing
- Test data removal
- Check Placeholder images
- Varnish Cache test
- Merge & Minify CSS
- Merge & Minify JS
- System Compilation
- Image Optimization
- E-mail Templates
- Check CMS Pages
- Newsletter subscriptions
- Database Backup
- Loading time of website (Speed)
- Enable Crawling
- Production Mode Switch
We will discuss each of these points in detail.
Go Live Checklist Explained:
1. Latest Version Check:
Magento keeps releasing its newer versions in 4-5 months. The newer version comes with security patches, fixes of existing issues, new features and functionalities and with better performance. Thus, it is imperative that you are using the latest version of Magento for your store. If it is not on the latest version, please let us know. We can help with Magento Upgrade to the latest version.
2. Requirements of the System:
There are some system requirements that must be fulfilled by your Magento store. Here are these:
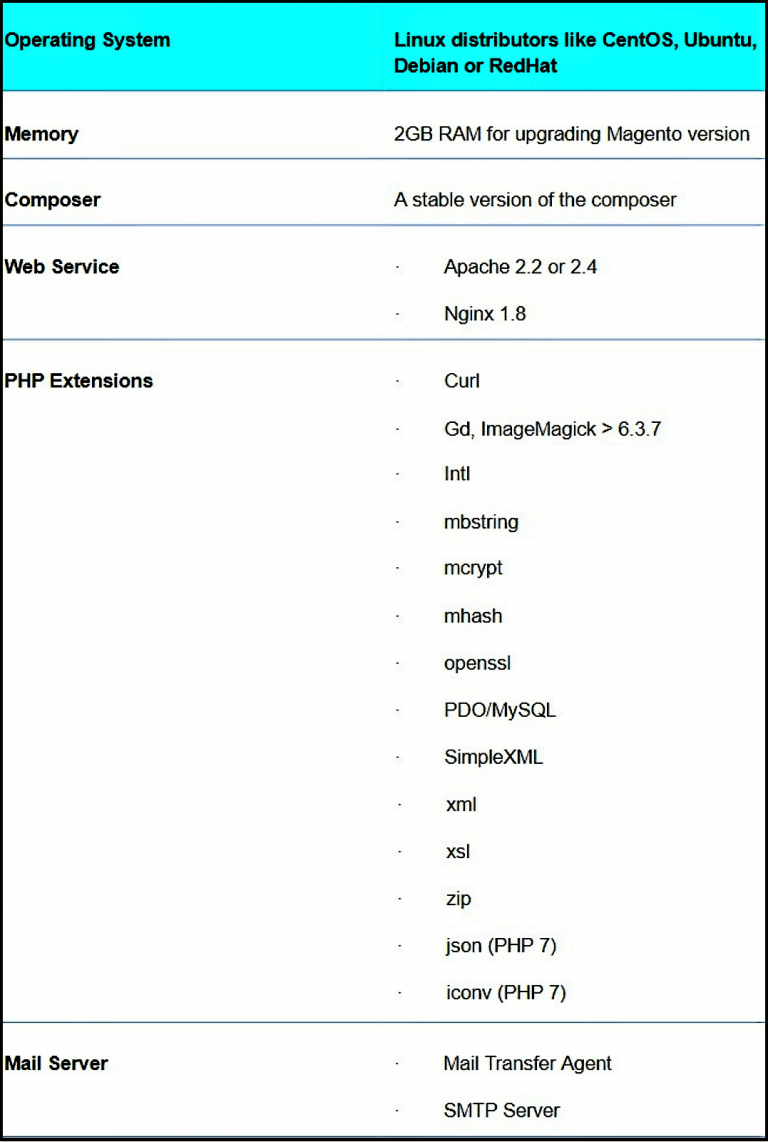
There are many other system requirements that a Magento development company like us will always take care of.
3. Check Favicon:
You must have seen a tiny image in the address or tab bar of the browser of a website. That tiny image is Favicon. Here’s an example:
The Amazon logo is the Favicon which is highly important for brand recognition. It has become more important because of the Google update for mobile search design which highlights the name of the website along with its favicon.
You can upload the favicon image through this setting:
Go to Content > Design > Configuration. Edit Store, within the HTML head, upload the image of the favicon.
4. Store URLs check:
Before launching the store, you have to check whether the URLs are properly working or not. Check these points:
- Working of Frontend URLs
- Store URLs must be user-friendly
- Remove index.php from the URLs
- 200 OK status
- Status of www, http, and https
5. SSL set up:
SSL is a standard technology for keeping the internet connection and browsing safe for the user. It prevents the site owners from reading and modifying any information transferred, including potential personal details. An E-commerce store must have a 100% trusted SSL security certificate with a secure frontend URL in the configuration.
An HTTPS URL symbolizes the SSL certificate of the website. Google also considers this factor for its ranking. You can set up the SSL in the Magento 2 store and then check this configuration.
Go to Stores > Configuration > General > Web > Base URLs > URL with https
6. 301 Redirects:
A 301 status code means the page has been moved permanently to a new location. It is useful for changing the URL of the page.
7. 404 Error Page:
A 404 error page will never hurt your website as per Google. You just have to navigate to Stores > Configurations > Web > Default Pages and check the settings. Magento also gives you options for customizing the Magento 2 404 Page for making it user-friendly.
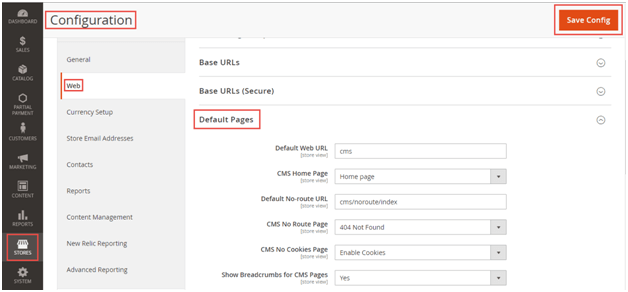
You just have to navigate to Stores > Configurations > Web > Default Pages and check the settings. Magento also gives you options for customizing the Magento 2 404 Page for making it user-friendly.
8. SEO Audit:
If the Magento store will not be easily discoverable to the users then there will be no sales at all. Thus, the store must be SEO optimized for gaining better rankings in the Google Search Engine Result Pages. Here are some points that you must consider:
- Optimization of the Meta Titles and Meta Descriptions
- The Robot.txt should be configured properly
- Enable automatic regeneration of the site through configuring Magento XMS Sitemap at Stores > Configuration > Catalog
- Schema Markup for better SERPs rankings
- Fix any broken link if found.
9. Google Tools Integration:
Analyzing the data of the customer from day 1 will help your store in the long run. Google Analytics is amongst the most popular analytic tools across the web. You must integrate it. Also, for Google Adwords, Magento comes with API integration. You just have to enter the Google API for both settings. Navigate to Stores > Configuration > Sales > Google API and change the settings.
10. E-mail Setup:
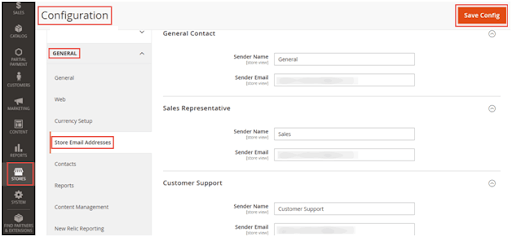
When you are developing the site in the staging environment you must be using test Email IDs. Now since you are going live, it is imperative that you change them to the actual business email addresses of your Magento 2 store. You can change the settings through this path: Stores < Configuration > General > Contacts.
Apart from these, you have to also take care of the transactional e-mails.
11. Cart Options:
Make sure that the functionalities of the cart page are proper. The calculations must be correct including tax and discount calculations. The users should be able to add, edit, and delete the products from the cart page.
12. Shipping methods:
The shipping methods that you are using should be already configured as per the desired settings from the Magento backend.
13. Payment methods:
Payment functionality is the backbone of an e-commerce store. You can’t afford a single mistake in the payment mechanism on your Magento 2 store. Whatever payment gateway you are using, you can configure its settings through this path: Stores > Configuration > Sales > Payment Methods
If you want to know which payment gateways are best for your Magento store, know it here.
14. Tax settings:
For implementing tax settings on your Magento 2 store, you have to go through this path: Stores > Configuration > Sales > Tax and check whether the settings are configured properly.
15. Store information check:
To check whether the general information is correct or not, go through these settings: Stores > Configuration > General > General and check your store information.
16. Admin URL modification:
Many e-commerce merchants make the mistake of not changing the admin path and using the default admin panel address. It is a cup of tea for hackers to identify the default Magento admin login page and start a brute force attack.
You can prevent this by using a customized admin panel address. For e.g. a simple change like from yourwebsite.com/index.php/admin to yourwebsite.com/store/’something-else’ will make a bit harder for the hackers to attack. For changing the Magento admin path in Magento 2 store you have to edit the env.php file.
17. Inventory check:
You can manage the inventory or stock on your Magento store in 2 different ways:
- Manage inventory without stock management
- Manage inventory with stock management
18. Extension license checking:
While developing the Magento you may have used a paid license which was free only for the trial period. If the trial period has been over then they will stop working properly and can impact the functionality of the store. Thus, either purchase the license and check if it is working for your new domain or not.
19. Cron Job Activation:
In an e-commerce site, there are certain repetitive tasks such as generating Google sitemaps, reindexing, etc. These tasks are executed through cron jobs. Thus, activate the cron job in your Magento store if required.
20. Caching & Indexing:
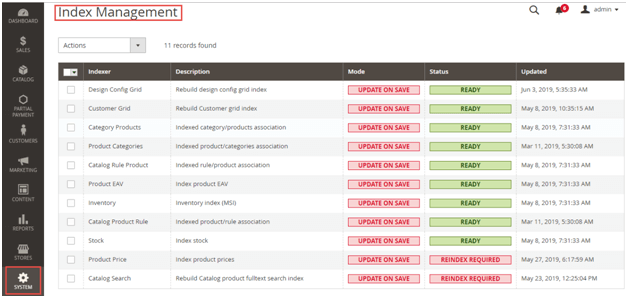
In Magento, the caching functionality is ON by default. But during the development process, many developers prefer to turn it off. Thus, before going live don’t forget to turn it ON. For checking the readiness of indexing, go to System > Index Management
21. Test data removal:
During development, the developers use test data such as orders, customers, accounts, products, etc. Remove this data before going live.
22. Placeholder Images Check:
These are the dummy images that are used when a product doesn’t have its own original images. You can upload the correct images at Stores > Configuration > Catalog > Product Image Placeholders
23. Varnish Cache:
Varnish is an open-source caching solution that can act as a web accelerator. It stores certain parts of the page such as files or page elements in the memory for reducing the response time or bandwidth. After a user loads the page the first time, the next time it will load faster. Varnish was designed specifically for website acceleration. It is recommended to turn on the caches from the Systems > Tools > Cache Management page.
24. Merge & Minify CSS:
You can use a CSS compressor for reducing the loading time of the site. You have to keep two versions of the CSS, one in readable form and then minify the version styles.css. You can configure the CSS settings through this path: Stores > Configuration > Advanced > Developer > CSS settings.
25. Merge & Minify JS:
Likewise CSS, you have to merge and minify JS for reducing the loading time of the website. You can configure the JS settings through this path: Stores > Configuration > Advanced > Developer > JavaScript Settings.
26. System Compilation:
You have to run this command for the system compilation:
php bin/magento setup:di:compile
System compilation is essential for code generation, code compilation, and reducing the loading time.
27. Optimizing images:
In a Magento store, there can be tons of product images. These images highly attract the user but on the other side can slow the site. Hence you must optimize these by either compressing them and making their format as either PNG or JPEG.
28. E-mail Templates:
While running an e-commerce store, there will be several occasions when you have to send different e-mails to the users such as Welcome e-mail, Forgot Password, Order Confirmation, Abandoned Cart Recovery mail, etc. You will require custom e-mail templates with your branding for every purpose.
29. Check CMS Pages:
Check if you are offering customized CMS pages like privacy policy, Terms & Conditions, etc.
30. Newsletter Subscriptions check:
If you are asking your customers their e-mail id to subscribe to the newsletter, then to avoid embarrassment, check the system again before going live.
31. Backup of a database:
Implementing the technique for timely backup so you don’t need to worry about losing the data after for the live store.
32. Optimize Speed:
Speed of the store plays a major role in the customer experience which in turn impact sales and profits. Do you know a 1-second delay in page response can result in a 7% reduction in conversions?
You can find all the loopholes by testing your site on an online website speed checker. You can use tools like Google PageSpeed, Pingdom, GTmetrix, etc.
33. Enable crawling:
Everyone wants to rank their website on top SERPs, for that Google must index your store. Enable all the settings that let Google to crawl and index the pages of your store.
34. Switch to production mode:
Last but not the least, switch to the production mode after completing all the tasks.
Now you are ready to go live.
How can we help?
At Ceymox Technologies, the best Magento development company in India, we are having expertise in developing a Magento store from scratch and to the final production model. We will take care of each mentioned aspect before going live. Let us know your requirements.
 Hubspot SEO Certified |  Hubspot SEO II Certified |  Google Ads Search Certified |  Google Analytics Certified |
Sreehari N Kartha is a skilled Digital Marketing Analyst at Ceymox, certified in SEO. His expertise encompasses a wide range of digital marketing strategies, including managing advertising campaigns on platforms like Google Ads, Facebook Ads, Instagram Ads, WhatsApp Ads, and LinkedIn Ads. With a strong foundation in SEO and SMM, Sreehari is adept at optimizing online visibility, driving engagement, and generating qualified leads and conversions. His passion for emerging technologies, such as Crypto, NFTs, and Web3, further complements his skillset, enabling him to navigate the dynamic digital landscape.
View All Articles