Delivering customer experiences that result in high customer retention, conversion, and average order values is the main target of every e-commerce retailer. Providing engaging and personalized content is highly crucial for both B2C and B2B e-commerce retailers, and Adobe Commerce is the best platform to achieve this. Our clients who are using Adobe Commerce have been constantly providing tailored shopping experiences to their customers. Adobe Commerce has intelligent features such as Product Recommendations, Live Search and advanced experience management tools which can keep the customers ahead of the growing expectations.
In the online business, the ability to rapidly develop content and deliver it to the customers is vital for success. This is the main reason that now Magento Page Builder is available for all Magento merchants i.e. both Adobe Commerce and Magento Open Source. When Magento 2.4.3 version was released, the Page Builder Functionality was added to the Magento Open Source. This content edition will eliminate the hurdles of the development.
Thus, now our Magento Open-source clients can also use Page Builder’s easy-to-use WYSIWYG content authoring and have a more seamless upgrade path to Adobe Commerce as the business grows. In today’s article, we will go through all the aspects of the Magento Page Builder.
Content Management in Magento’s Earlier Versions:
In the Magento 1 versions, the content management capabilities weren’t so much user-friendly. The WYSIWYG editor doesn’t give much control and using Magento’s widgets and blocks weren’t a great option for e-commerce teams. With such limitations, many e-commerce retailers found it better to go for a hybrid solution. For e.g. Drupal + Magento or WordPress + Magento were the common combinations that Magento development companies like us used for managing CMS pages and other content. However, there was a limitation even in this approach. During those days, these CMS platforms weren’t built to work together as they can work today. This has been achieved by progression around APIs in both areas and a general shift towards headless.
With all these things, and the rival e-commerce platforms are investing in content management (like Shopware & SAP Hybris), it was obvious for Magento 2 to look for a content management system. Although Magento took a long time to arrive (after Magento acquired GeneCommerce’s Bluefoot extension in 2016), Magento official released Page Builder (in its 2.3.1 release) for only Adobe Commerce users. But now it has made it available for the open-source as well.
This is a very considerable move by Magento. The Page Builder can now save hours for just putting together the basic landing pages, or a product page having a video or size chart. With the introduction of Page Builder, Magento has at least addressed a significant issue that had caused headaches for retailers, marketing teams and developers for quite some time.
What is Magento Page Builder?
Magento Page Builder has an in-built drag & drop mechanism for managing content. From the past few years, the demand for drag-and-drop content management tools has been increased rapidly. Thus, it was inevitable for Magento to follow this pattern and create a tool by which even the non-technical team members or sellers would be able to create the content pages quickly and easily, and other key elements & templates.
Although a few Magento Competitors have a solid next-level CMS, Salesforce is due to release their Page Designer solution soon, SAP is coming with a CMS cockpit, Shopify & BigCommerce use Shogun (a 3rd party solution), so this was highly required from Magento.
Now you don’t need to use the basic WYSIWYG editor or any widget or block to manage content, the Magento Page Builder give you a fast & intuitive interface for creating product and category content & full content pages. You just need to drag & drop the desired elements on the required positions of the page and then add content to those elements. If there are some custom requirements of the client then the developers can additionally build page builder components.
Remember not all the features & functionalities of the Page Builder will be available in Magento open source and will require an Adobe Commerce license. Some of these features are:
- Content Staging & Preview
- Dynamic blocks
- Native integration with Adobe Commerce exclusive features like Product Recommendations
How to create content with Magento Page Builder?
There is a straightforward process of creating content pages with Magento Page Builder. If you are editing a product, page, or category, then you will find a button labelled “content”. After clicking on this content, a menu will slide out with all the options of content like this:
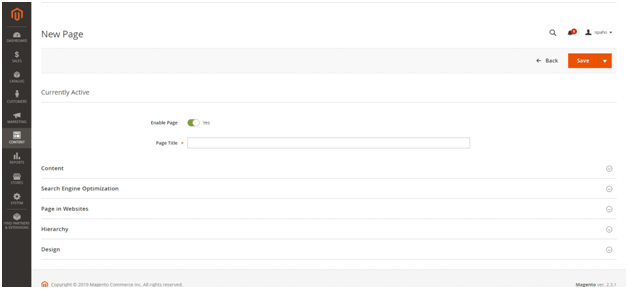
If you want to create a new page, firstly save it before editing content using the Page Builder.
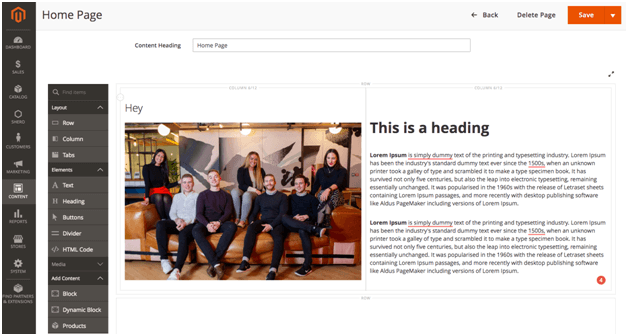
There is a field of “Content Heading” which will act as the heading of the page or (H1 header) by default. Since it will be displayed before any other content, you may wish to leave this field blank and add headers if you need them using the Page Builder Header content type.
In the Page Builder, you can easily add rows & columns and even resize them, which is a great thing for non-technical users. The admin interface works on a 12-column grid, thus having high flexibility for designing the pages. Just drag & drop a row on the main canvas, then move columns on that row. From there, you can drag the sides of the columns to resize. The other columns will resize automatically to fill the row.
Although the columns provide the framework for content management, there are numerous native types of content that comes by default. These are categorized into 3 groups: elements, media, and pre-existing content. Some of the standard elements are headings, buttons, text, divider lines, and HTML code snippets. In the media section, you can add images, videos, banners, sliders, and maps. Lastly, in the “add content” section, you can add static content blocks, dynamic product blocks and products from the catalogue.
You just need to dragging & dropping for activating all these components on the required position, and then click on the settings icon for that particular element. From the settings, you can do formatting and layout changes, upload media files or add content. Each content type element has its own set of fields with certain settings.
After uploading & editing the content in the Page Builder, you just need to press the orange “Save Button” placed at the top right corner. Before finalizing the page, you can also preview the page to see exactly how it will appear as a part of the store. Along with this, users can also schedule the changes in the content. You can also use page builder along with the Commerce features such as customer segmentation and content staging & preview (however, only in Adobe Commerce and not in Magento Open-Source).
Using Products in Magento Page Builder:
Magento Page Builder comes with an in-built relationship with product recommendations. Thus, you can create rule-based sets of products within a page. This logic simplifies choosing the products to display. Multiple options are present for how to layout the products as well.
There are many Magento users who generally use a 3rd party solution for managing product recommendations that require an HTML block or are developed as a separate element.
Scheduling Content Updates:
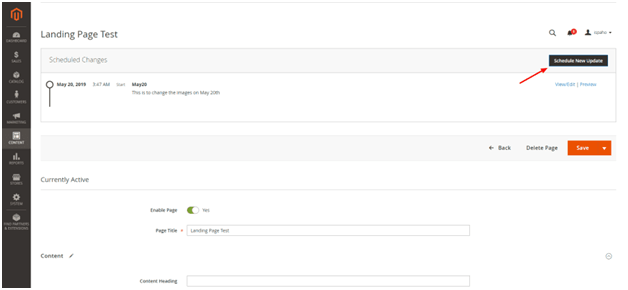
As we mentioned above, the Page Builder users can schedule updates of content for future dates (only present in Adobe Commerce). You can even schedule an update on a CMS page to change images, which will only be put live on the scheduled date. This feature is highly useful as it will allow the end-user teams to take a proactive approach for managing content rather than constantly updating things at the instant.
For scheduling content, you just have to click on the Schedule New Update button in the top right of the page edit screen. An overlay will be displayed with some standard fields and extra options. In these fields, you can enter the name of the update, add a description so you can remember for future why you have applied this update and what is the purpose of this update, specify the start date of the update, and if you wish you can also mention the end date (not necessarily).
After completing these fields, the rest of the page looks the same as the standard edit page screen, and the page builder will work exactly as we mentioned above. Any scheduled updates will be displayed on the top of the screen, so they are clearly visible while you are working on the page.
Editing of Products and Category:
While adding or editing products or categories, you will have two choices: either work with the old style WYSIWYG editor which uses TinyMCE or switch to the new Page Builder editor.
If you opt for Page Builder editor, then you will get a full-screen editing area, with the same Page Builder placed on the left side. From the Page Builder, you can manage the contents in the same way with the same options.
Although it is not used as frequently as for other CMS pages, it is still great to have a page builder on these pages as it helps in managing media on the product pages. For adding a banner, detailed content area to a PDP, you can use page builder.
Extending Page Builder:
We find the best thing about Page Builder is that we can extend its functionality and add new components which could be anything like a specifically styled content area, any form or an interactive image or video. Our developers have even customized the existing content types and add new ones. Since Page Builder is not a fully-fledged enterprise CMS, it is highly beneficial for merchants to manage content.
Wrapping Up:
Although Magento Page Builder isn’t an enterprise CMS, it is in the right direction and shows reliable, intuitive means of delivering content that reduce the work of hours. In this article, we have gone through all the aspects of Magento Page Builder. At Ceymox Technologies, we are having expertise in developing Magento stores from scratch with advanced capabilities. Let us know your requirements.
 Hubspot SEO Certified |  Hubspot SEO II Certified |  Google Ads Search Certified |  Google Analytics Certified |
Sreehari N Kartha is a skilled Digital Marketing Analyst at Ceymox, certified in SEO. His expertise encompasses a wide range of digital marketing strategies, including managing advertising campaigns on platforms like Google Ads, Facebook Ads, Instagram Ads, WhatsApp Ads, and LinkedIn Ads. With a strong foundation in SEO and SMM, Sreehari is adept at optimizing online visibility, driving engagement, and generating qualified leads and conversions. His passion for emerging technologies, such as Crypto, NFTs, and Web3, further complements his skillset, enabling him to navigate the dynamic digital landscape.
View All Articles