In the e-commerce industry, no technology is stable and hence to stay ahead in the e-commerce market, you have to constantly evolve your e-commerce store as per the requirements of the customer. In today’s time, you don’t need to be a developer or a coder for running an e-commerce store. For running an e-commerce store, you will have to choose an e-commerce developing platform. There are a plethora of options available for this among which Magento and Shopify are the most trending options. Magento is currently holding more than 25% of the market share. Shopify is popular as a hosted platform while Magento is popular as an open-source e-commerce platform.
If you are currently using Shopify as your e-commerce platform then there may be a lot of reason for which you may wish to migrate to Magento. The common reasons are adding new features and functionality, better website performance, increase traffic, and optimizing the speed. Magento 2 is an advanced, flexible, scalable, and feature-filled e-commerce platform that will meet all your business requirements. In this article, we will be discussing how you can migrate your existing Shopify store to Magento 2.
Both, Magento and Shopify are powerful platforms, but eCommerce tendencies show that there are a lot of online store owners that decide to migrate from Shopify to Magento.
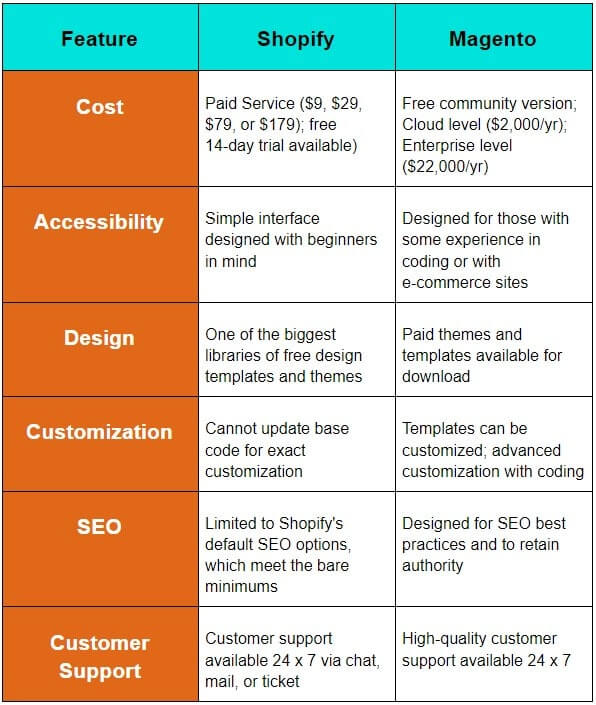
Shopify & Magento Comparison: Overview
Reasons for migrating your Shopify Store to Magento 2:
1. Readiness Check:
Firstly, the Magento will check that if you are ready for migration or not. It will verify the hosting settings, PHP version, PHP extensions, compatibility, and file permissions. You can initiate with a “Start Readiness” check.
If any error arises, the Magento installer will be notified. After it gets successfully finished, click “Next” in the top right corner.
2. Add a Database:
Now you have to enter the database details for setting up your Magento store. You have to enter all the details such as Database Server Host, Database Server Username, Database Server Password, Database Name, Table Prefix, etc. After entering all the details click on the Next button.
3. Magento Web Configuration:
Here you will enter all the details of your website to configure your site. It includes fields such as Address of Store, Magento Admin Address, Encryption Key Type, and Session Save selections. In the Encryption Key, you have to use a Magento generated-key or your own encryption key. After entering all the configuration options, you have to click on the Next button.
4. Store Customization:
Now, you have to customize your Magento store. You have to enter the default time zone, currency, language etc. In future, you can even change these values. There are some drop down menus such as:
- Store Default Time Zone
- Store Default Currency
- Store Default Language
You can even use Advanced Modules Configuration for selecting or deselecting some particular modules to set up or left for now.
5. Admin Account:
For managing your Magento store you have to set up your Admin account. You have to remember these credentials, as using these credentials you can access the backend of your Magento store. Enter the username, e-mail address, a strong password, etc. After entering all the entries, click on the Next to proceed.
6. Installation Completion:
After making all the necessary selections, you can begin the installation. Click on the “Install Now” button for initiating the process.
After completing this, you will be navigated to a screen which gives you the complete details of the installation. At this page, you will get all the information you need to know about the installation process. After checking out all the information, click on the “Launch Magento Admin”.
You will be redirected to the Magento Sign-in page. Enter the username & password to log in. After login, you will be advanced to the Magento dashboard. You have finished the installation, and the Magento access is working fine.
Shopify to Magento Migration:
Since we have compared both the e-commerce platforms and also realized the benefits of switching to Magento, we have also mentioned the way of migrating your existing Shopify store to Magento. The method you choose for the migration will come down to your expertise and experience along with the time you can dedicate for the transfer and the cost associated with the migration process. There are 3 different ways of migrating your store data:
- Migration of store data manually
- Use any 3rd party migration app
- Hiring professional Magento developers
We will discuss each of these methods in more detail.
Migration of Store Data Manually:
Export data from the Shopify Store:
If you believe that you are experienced enough to do this then do it by yourself. You have to migrate the data of customers, product, orders, etc. manually from your existing Shopify store to Magento.
It will initiate by exporting the CSV files for every data you require in your new Magento stores such as products, customers, and orders. When you get these files, you can import them on your Magento store.
From the Shopify admin page, select “Products,” and click “Export” above the product list.
A window of “Export products to CSV file” will pop-up. You can select All Products in the Export and CSV for Excel, Numbers, or other spreadsheet programs under Export as. After choosing all the options, click on Export products.
The exported CSV file will be e-mailed to the e-mail account which is linked with your Shopify store. You can import many different types such as Customers, Orders, Products, etc. You will require the CSV files for importing the data to your new Magento store.
Importing Store Data into Magento:
Now, this is a bit complicated process for importing data into the Magento store. For making it simpler, we have broken down each step.
1. Preparation for data transfer:
There will be a left sidebar in the Admin menu. Click on the System in that, and then in Data transfer click on import.
In the Import screen, you have to first select the settings before proceeding further. First, you have to choose the Entity Type where you will be transporting within the Import Settings heading. You can select the entity type which you are migrating selecting from:
- Advanced Pricing
- Products
- Customers & Addresses
- Customers Main File
- Addresses of Customers
2. Choose the import data:
Still, you are on the Import screen. Since we are done with the import settings, now we can move to the Import behaviour section.
In the Import Behaviour menu, you can select actions such as Add/Update, Replace or Delete. Then you can select the parameters if an error occurs in the Validation Strategy by choosing the following,
- Stop an error
- Skip error entries
3. Identify the import file:
Now, you have to choose the file that you have to import. Next to “Select File to Import,” click “Choose File.” From your file explorer, find the CSV file that you prepared for import and click “Open.”
In the Images File Directory, input the relative path to the location where uploaded images are stored on the Magento server. For example, it may look like this: var/import.
4. Check the imported data:
After importing the data you also have to check it. You can click on “Check data” in the top right corner. It will take a few moments to check the data. If the imported data is valid then you will find a verification message in which it will be mentioned that the File is Valid and to start the import process you have to press Import button in the Validation results. If you receive this message, your data is ready to be imported. Click “Import” to start the process.
In the other case i.e. if the import is invalid then you can find the errors in the Validation Results. You have to correct each mentioned error, and then try to initiate the import again. Once the data gets validated, it will be imported. The process will definitely be going to take some time. If at any time an error occurs, an error message will appear under Validation Results. When this happens, correct the error listed and initiate the import again.
Now that you’re done, repeat the process for the different entity types you need to transfer.
Using any 3rd Party Migration App:
If it is complicated for you to manually migrate your existing Shopify e-commerce store to Magento or you don’t have time for this, then you can opt for migrating an app instead. There are many 3rd party migration apps which you can use for facilitating the migration process. It will include a lot of automation. The process will get break down into simpler steps and the transition will be accessible for those who have little experience or coding knowledge.
Hiring Professional Magento Developers:
If both the above-mentioned options are too time-consuming or complex for you then we will recommend hiring professional Magento developers who can migrate your existing store to Magento fluently. They will carry out the migration process for you. You can also outsource the work to a Magento Development Company like us if you don’t have in-house Magento Developers. Magento developers have vast experience in this regard. They are coding experts thus they can easily resolve the errors which will arise within the process.
Wrapping Up:
In this article, we have studied the process of migration of the Shopify store to Magento. It is not an easy task especially if you don’t have coding knowledge or in-house Magento developers. We, at Ceymox Technologies, the best Magento development company in India, are having expertise in migration of Shopify to Magento, WooCommerce to Magento, Upgrading Magento Versions, Creating a Magento Store from Scratch, Magento Extensions Development, and much more. Please let us know your requirements.
 Hubspot SEO Certified |  Hubspot SEO II Certified |  Google Ads Search Certified |  Google Analytics Certified |
Sreehari N Kartha is a skilled Digital Marketing Analyst at Ceymox, certified in SEO. His expertise encompasses a wide range of digital marketing strategies, including managing advertising campaigns on platforms like Google Ads, Facebook Ads, Instagram Ads, WhatsApp Ads, and LinkedIn Ads. With a strong foundation in SEO and SMM, Sreehari is adept at optimizing online visibility, driving engagement, and generating qualified leads and conversions. His passion for emerging technologies, such as Crypto, NFTs, and Web3, further complements his skillset, enabling him to navigate the dynamic digital landscape.
View All Articles