Magento 2 is one of the most reputed and highly popular e-commerce development platforms. It offers tons of advanced features and high-grade security. The features are suitable to develop a top-notch e-commerce store and if you still require any custom features then either you can find a Magento extension or you can create your own modules and themes. One of the major reasons people choose Magento 2 over other e-commerce platforms is its ability to add multiple languages to the store. In this article, we will go through different topics like:
- What is internationalization and why it is crucial for your business?
- How to add multiple languages in your Magento 2 store?
- How to translate CMS content including pages?
- How to internationalize modules and themes including adding translations, changing assets, and making changes in the module style or theme?
Why go for Internationalization?
Internationalization (often abbreviated as i18n) refers to the translation of your website and changing the design or website style on the basis of the chosen language. There are multiple ways of doing it depending upon the programming language or framework upon which you are working upon. However, it is not necessary to do everything manually from scratch as there are tools available to make it easier.
Internationalization will increase the visitors to your site as you can attract audiences from different countries which communicate in different languages.
It plays an important role in e-commerce. By giving options of multi-languages, the store can understand its users and is able to convert them, making the store available globally.
Magento 2 Website Structure:
Before diving deep into how to add a language in Magento, let’s know about the Magento 2 website structure first.
You require at least one website in the Magento 2 although you can set up multiple stores in Magento 2. Then, inside each store, you need at least one store view.
Magento 2 installation always a website by default, a store in the website, and a store view. The website is like a group in which you can organize multiple stores.
In the store, you specify which categories will be sold i.e. the products going to sell in the store. For instance, you can split the website into two stores for electronics and sports goods. Then we have a store view which belongs to a store. The users see a store view on the frontend which has its own theme, pages, products, etc.
This structure lets you separate your e-commerce store into different sections or even different websites. For example, you can have all your products in the same Magento instance, and further split these products into different websites or different stores inside the website.
You can also configure different settings for each website, store or store views in the Magento instance. You can also change settings for an entire website whose changes will reflect in all stores.
Adding Languages in Magento 2:
Languages are dependent on store views. Every store view can have its own language. Thus, for adding a new language you have to add a new store view with a different language.
You don’t any extra configuration if the store view should have the same settings as the parent site.
Adding a Store View:
Now we will know how to add a new store view in Magento 2 using the Admin panel and then how to choose the language of that store view.
Add a New Store View:
First login to your Magento 2 admin portal and then navigate to the Stores tab from the sidebar. Within the Stores tab, choose All Stores.
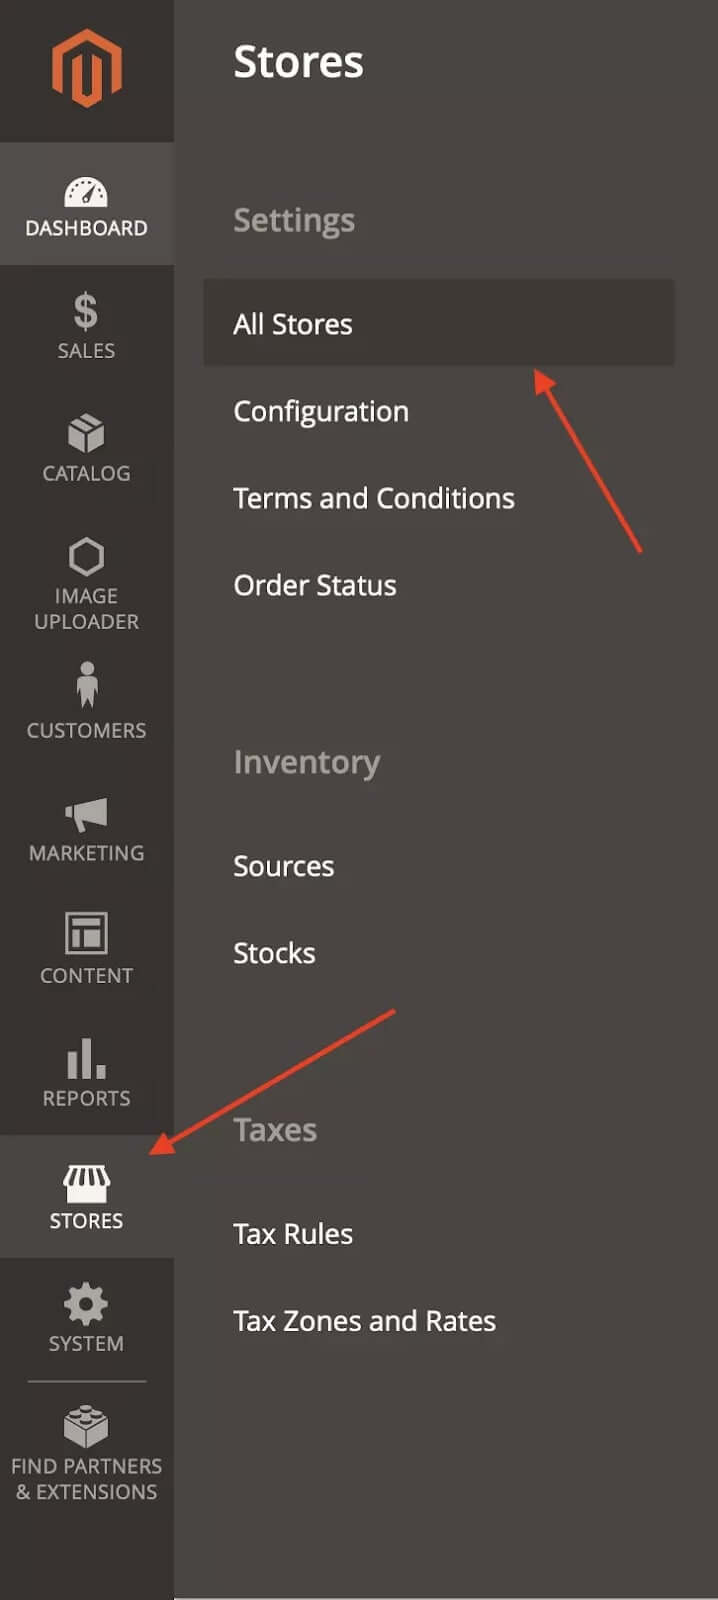
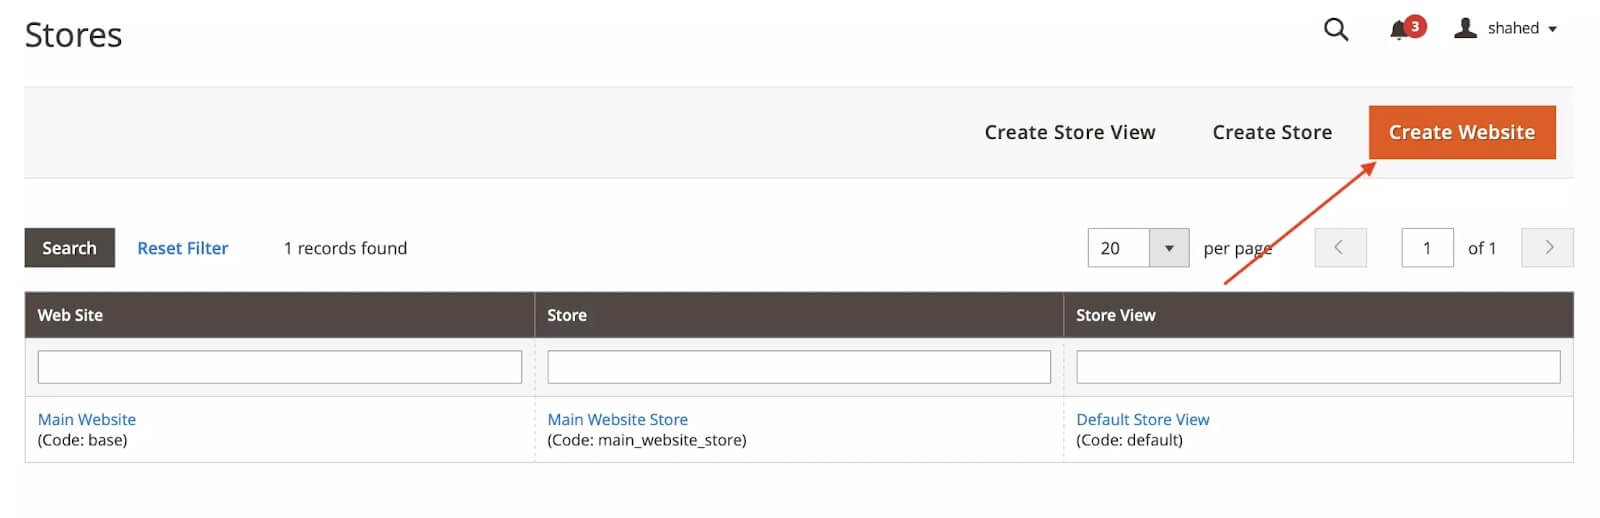
On this page, click Create Store View.
On the next page, you will find a form to fill in. If there are multiple stores on your site then you have to first choose the store to which this store view belongs.
After that, enter the name of this store. Remember, this name will be shown to the users in the front end. So, you can name it based on the language you are adding.
Add the code for the new store. You can choose any code you want but it is better to set the code based on the language, like en for English.
Now you can change the Status to Enabled to make sure the users see the store view.
There is a sort order which is used if you are adding a new language and want it as the default language. This means, that when the user will land on your site, the content will be shown in this default language.
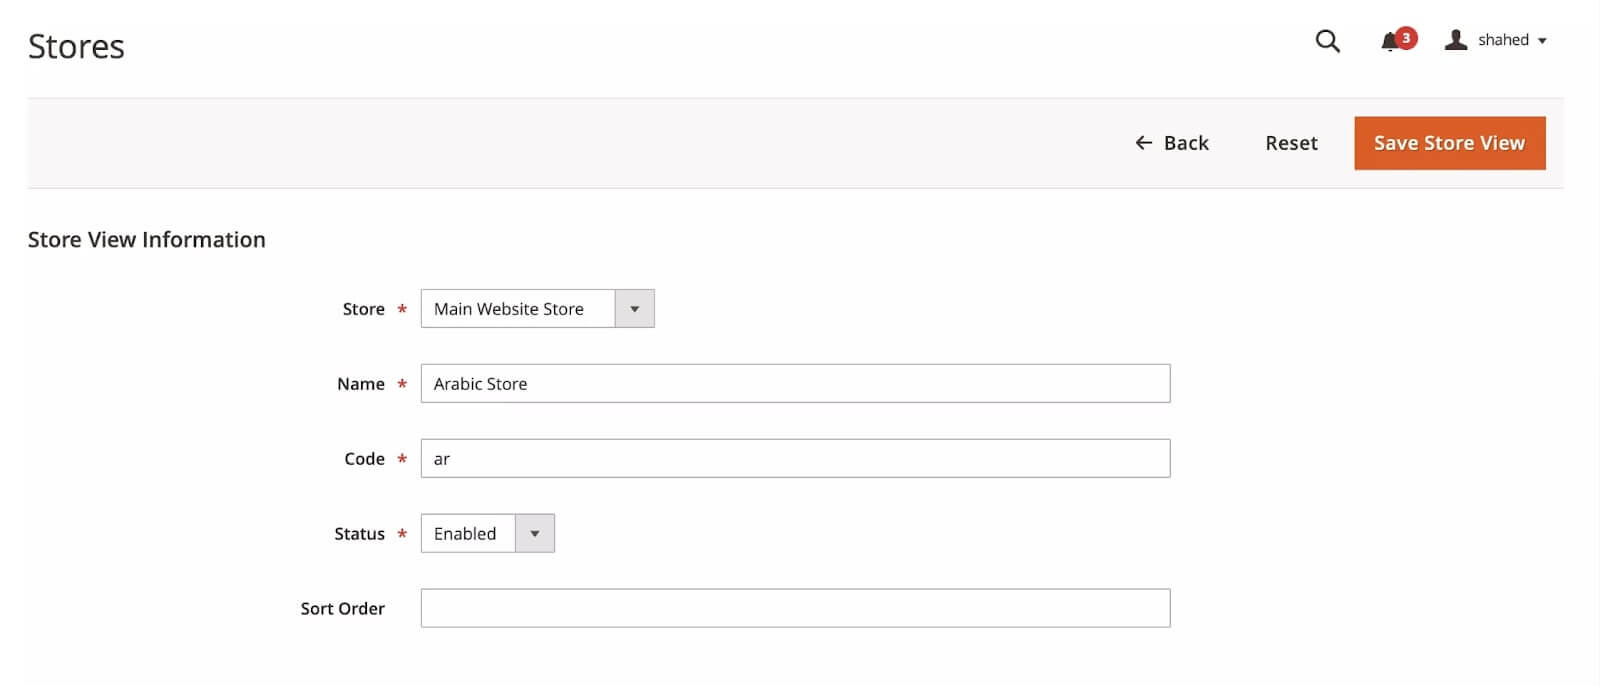
After configuring all the settings, click on the Save Store view, and the store view will be added.

Clear the Cache by clicking on Stores in the sidebar and then navigate to Cache Management.
After clearing the cache, go to the website. On the basis of the theme, you will find a dropdown in the site header to choose between different store views.
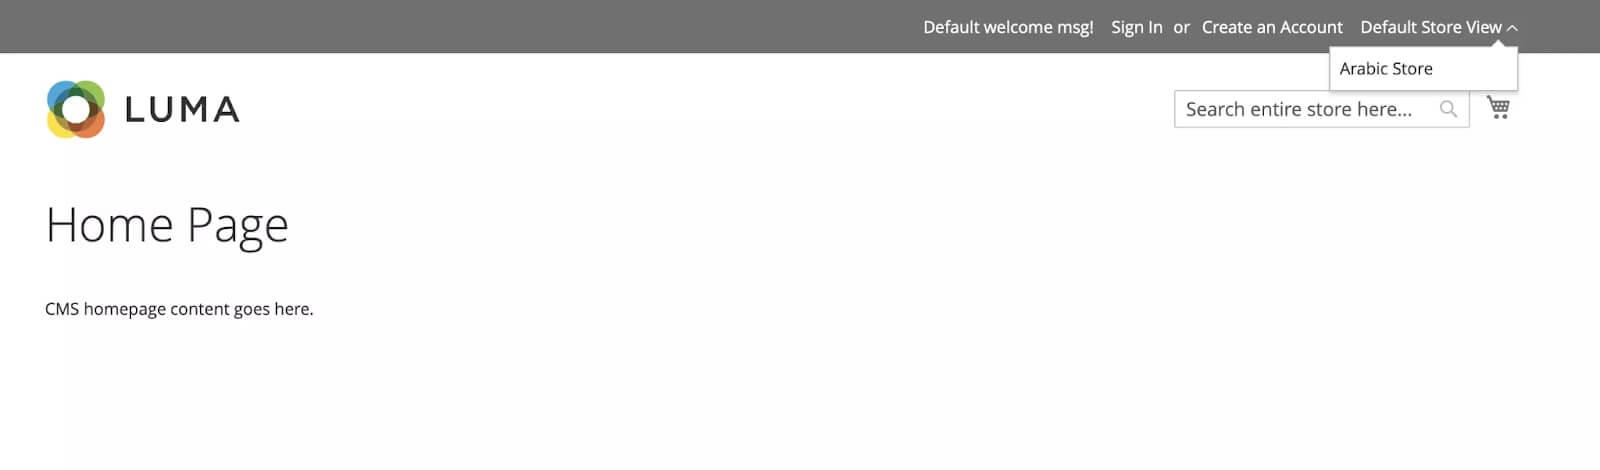
The test page will look on the basis of your theme. In the above screenshot, it is Magento’s default LUMA theme.
Choose a language for the store view:
Now, we will select the store view language. For doing this, navigate to the admin panel and in the Stores tab, click on Configuration.
Remember, in the Magento admin panel, you will find a dropdown with the label Scope in the top left corner on almost every page to change the website, store or store view. It is useful when you want to configure settings to a particular store, website, or store view else the default settings are applied to all stores.
In the configuration page, select the storeview that you have just created from the drop down. To confirm your action, click OK in the popup.
In the sidebar, you will find a General section, choose General tab in this section. Open the collapsible with the title Locale Options. In this, uncheck Use Website present on the first field, which should be Locale. Then choose the language from the dropdown.
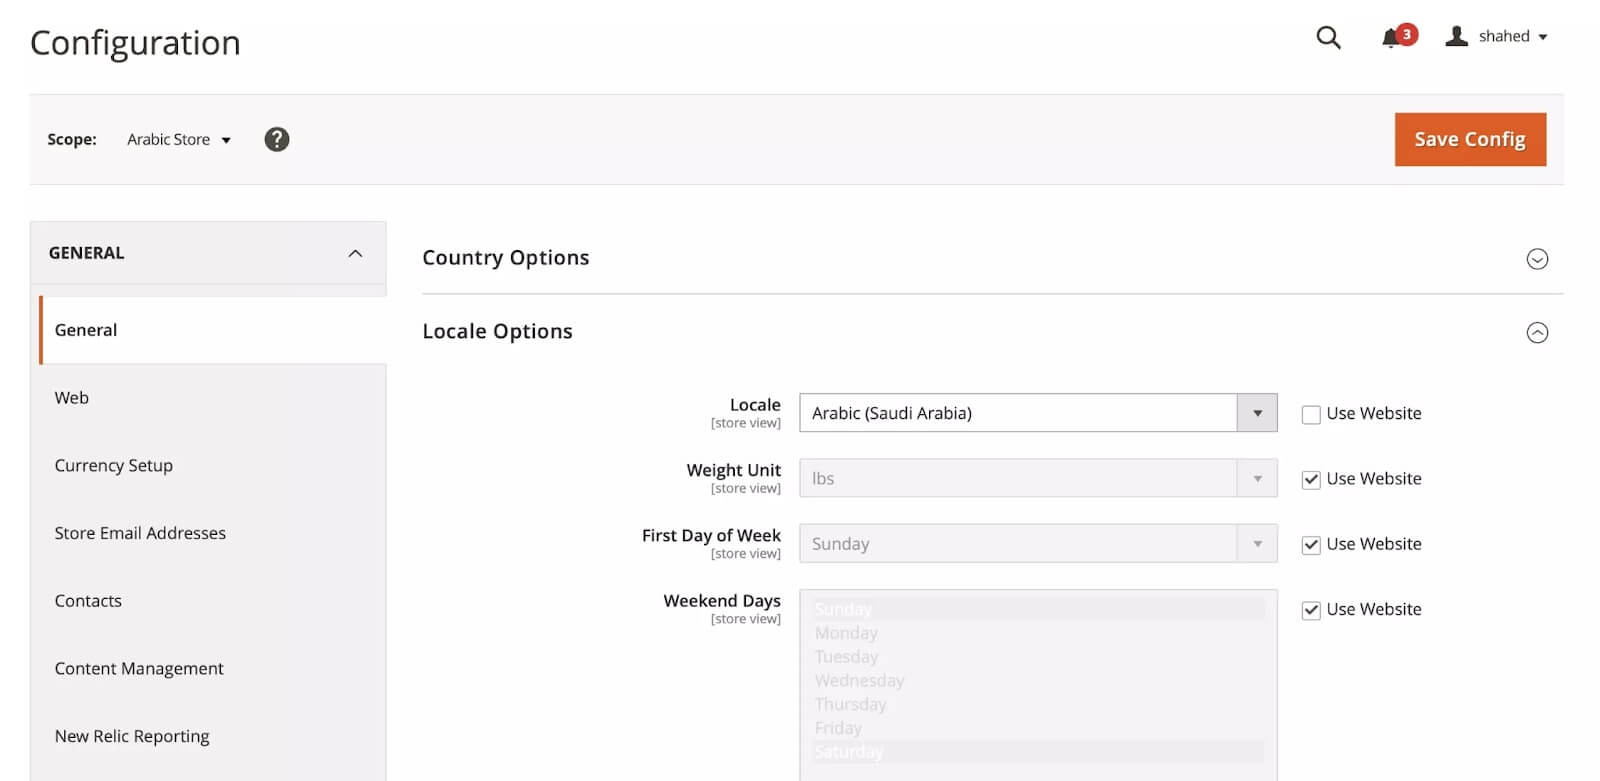
Let’s select the Arabic language. After done, click Save Config at the top right corner. It will change the language of the website. But as of now there will be no changes on the store because we still have to add the translations to the language we added.
Install Magento 2 Language Packs:
Apart from the strings and text you may need to add in your own module, as strings are quite common in Magento 2 open source, there are many free and open-source Magento 2 language packs by which you can easily add translations in your Magento 2 website. On the Magento’s marketplace, you can find many such extensions, although most of them are not free.
Wrapping Up:
In this article, we have gone through the mechanism of adding multiple languages in the Magento 2 store. At Ceymox Technologies, the best Magento development company in India, we are having expertise in developing Magento stores from scratch. Let us know your requirements.
 Hubspot SEO Certified |  Hubspot SEO II Certified |  Google Ads Search Certified |  Google Analytics Certified |
Sreehari N Kartha is a skilled Digital Marketing Analyst at Ceymox, certified in SEO. His expertise encompasses a wide range of digital marketing strategies, including managing advertising campaigns on platforms like Google Ads, Facebook Ads, Instagram Ads, WhatsApp Ads, and LinkedIn Ads. With a strong foundation in SEO and SMM, Sreehari is adept at optimizing online visibility, driving engagement, and generating qualified leads and conversions. His passion for emerging technologies, such as Crypto, NFTs, and Web3, further complements his skillset, enabling him to navigate the dynamic digital landscape.
View All Articles